GesFicher Sync
Es la aplicación que permite conectar terminales físicos de marcaje con GesFicher. Si su empresa posee terminales físicos de control de presencia (lectores de huella, lectores de tarjeta, lectores de iris, tornos de control de entrada, etc), los empleados pueden realizar los marcajes en dichos terminales y a través del programa GesFicherSync, se sincronizará la información con GesFicher de forma automática.
Para que la información se sincronice, debe realizar un pequeño paso de configuración, explicado más adelante.
Instalación
1) Instalar el programa Borland Database Engine, desde el siguiente enlace:
BDE 5.2
2) Instalar el motor de base de datos Firebird 2.5.9, desde el siguiente enlace:
Firebird 2.5.9 (64 bits)
Firebird 2.5.9 (32 bits)
3) Descargar el programa GesFicher Sync, desde el siguiente enlace:
GesFicherSync
Debe descomprimir el contenido del fichero ZIP en una carpeta en su servidor, a través de algún programa de descompresión, como por ejemplo:
WinRar
WinZip
Configuración en web de GesFicher
Para que el proceso de configuración de GesFicherSync sea más sencillo y automático debería acceder a GesFicher con un usuario administrador y configurar lo siguiente:
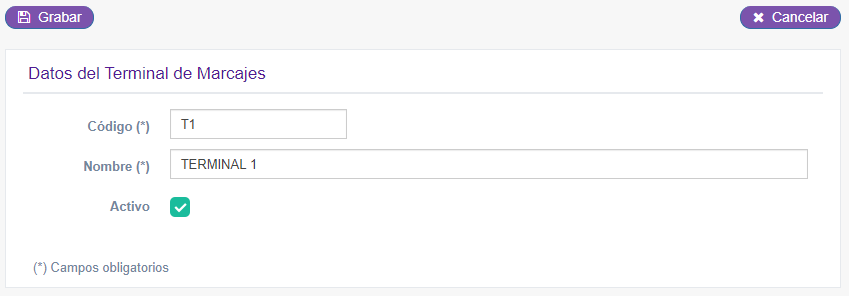
- Crear los "Terminales de marcajes", tal como se indica en este mismo manual:
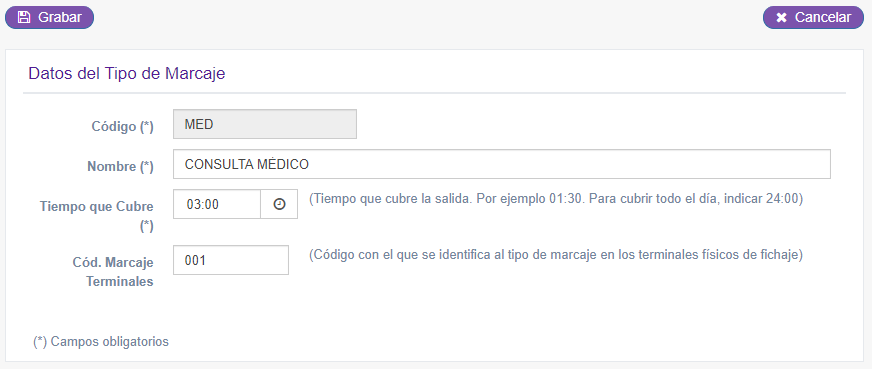
- Crear los "Tipos de marcajes" que se pueden registrar en el terminal físico de marcaje, tal como se indica en este mismo manual. Para que el proceso de sincronización funcione, debe indicar en el campo "Cód. marcaje Terminales" el código con el que ese tipo de marcaje se identifica en el terminal de marcaje.
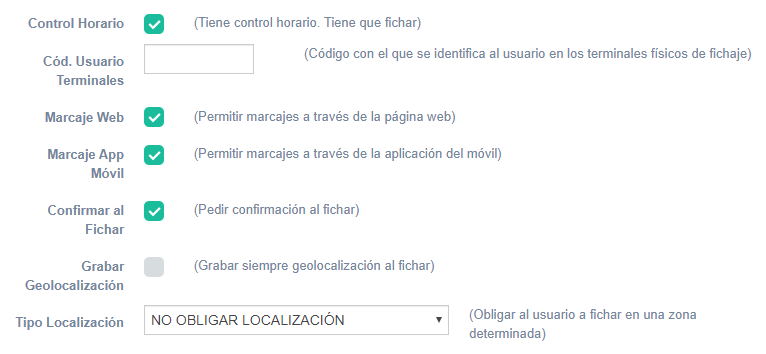
- Configurar los "Usuarios" e identificarlos con el "Cód. Usuario Terminales", tal como se indica en este mismo manual.
Configuración GesFicherSync
Al ejecutar el programa "GesFicherSync.exe", se mostrará la pantalla inicial de configuración, donde debe indicar los datos de su empresa.
Configuración general
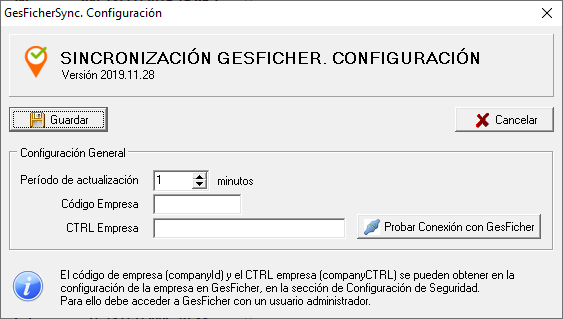
- Período de actualización: Permite indicar cada cuantos minutos se sincroniza la información de los marcajes con GesFicher.
- Código empresa (companyId): El código de empresa se obtiene en la opción de "Configuración empresa" en GesFicher, en la sección de "Configuración de seguridad". Para ello debe acceder a GesFicher con un usuario administrador.
- CTRL empresa (companyCtrl): Es el código de control de comunicaciones de datos de su empresa con GesFicher. Se obtiene en la misma pantalla que el código de empresa, indicado en el punto anterior.
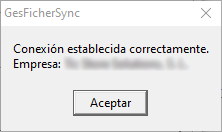
Una vez haya indicado el "Código empresa" y el "CTRL empresa", puede pulsar el botón "Probar Conexión con GesFicher" para comprobar que la comunicación con GesFicher es correcta. Debería mostrar un mensaje indicando el nombre de la empresa:
Importar terminales de marcajes
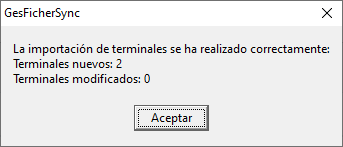
Pulse el botón "Guardar" y le preguntará si desea importar los terminales de marcaje configurados en la web de GesFicher. Es conveniente que los terminales estén previamente creados en GesFicher tal como se ha indicado anteriormente. Se le mostrará un mensaje indicando los terminales que se han conseguido importar de GesFicher.
Configurar terminales y activarlos
Le aparecerá un mensaje indicando que debe configurar los terminales y activarlos para que se envíen los marcajes a GesFicher.
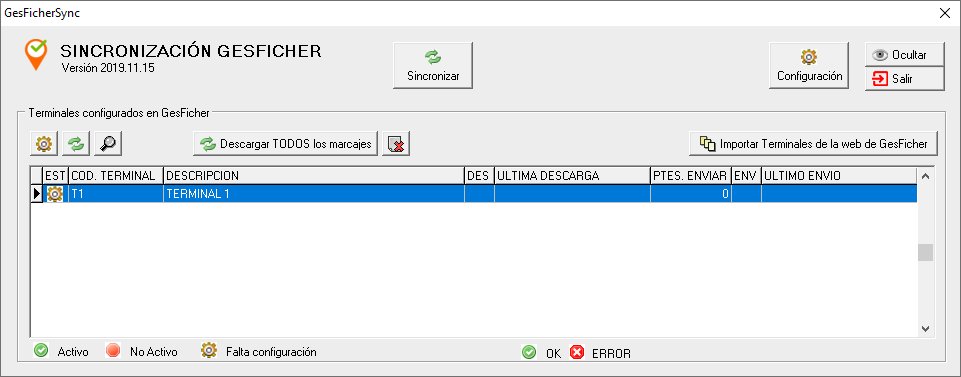
Se le mostrará la siguiente pantalla, con la lista de terminales importados.
Puede configurar cada terminal, haciendo doble click en la línea o seleccionar la línea y pulsar el botón  , justo encima de la lista de terminales.
Accederá a la pantalla de configuración del terminal, donde, dependiendo del tipo de terminal, deberá indicar una configuración u otra:
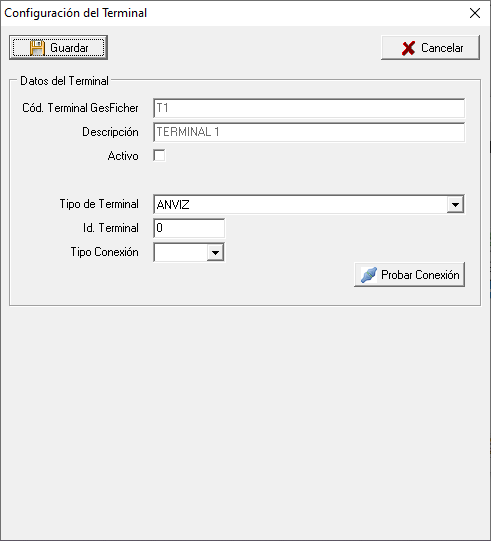
Una vez indicada la configuración, podrá realizar un prueba para ver si se consigue conectar con el terminal físico de fichaje, pulsando el botón "Probar Conexión".
Si la prueba de conexión ha sido correcta, puede marcar la opción para "Activar" el terminal y pulsar el botón de "Guardar".
A partir de este momento, se sincronizarán todos los marcajes realizados en el terminal con GesFicher. Si el terminal tenía almacenado algún marcaje, se enviará inmediatamente.
GesFicherSync
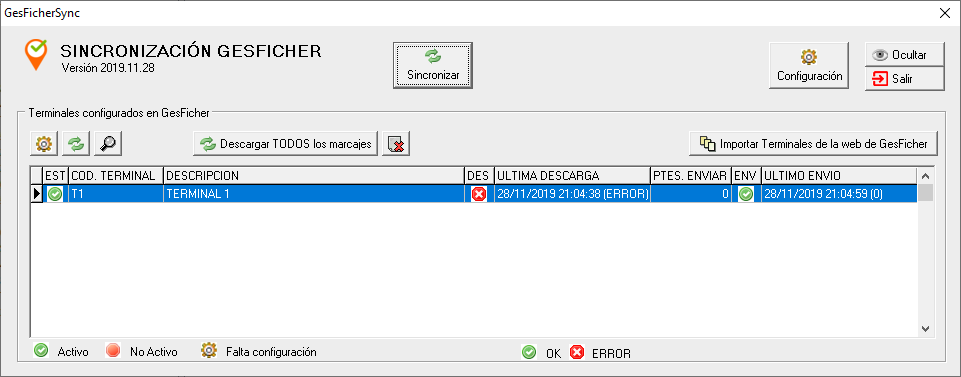
Una vez que se han configurado los terminales de marcaje, se sincronizará automaticamente la información con GesFicher. La pantalla principal de GesFicherSync es la siguiente:
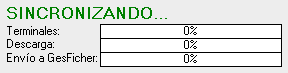
 Lanza el proceso de sincronización de todos los terminales configurados. En la configuración general de GesFicherSync se puede indicar el número de minutos tras los cuales se actualiza la información de los terminales. Pulsando este botón se fuerza a una sincronización en este instante. Se mostrará una barra de progreso por cada terminal, indicando el progreso de descarga de la información de los terminales y su posterior envío a GesFicher.
 Permite acceder a la pantalla de configuración general de GesFicherSync
 Permite ocultar la ventana de GesFicherSync, sin cerrar el programa. Tiene el mismo efecto que si pulsa el botón con la "X" de cerrar la ventana. El proceso de sincronización de los marcajes seguirá activo.
 Permite salir de GesFicherSync. Si sale del programa, dejarán de sincronizarse los marcajes con GesFicher.
- Permite configurar un terminal. Si en la lista de terminales hay alguno que aparece con ese icono, indica que el terminal no está configurado. Este botón permite acceder a la pantalla de configuración y activación del terminal.
 Permite lanzar el proceso de sincronización del terminal que esté seleccionado.
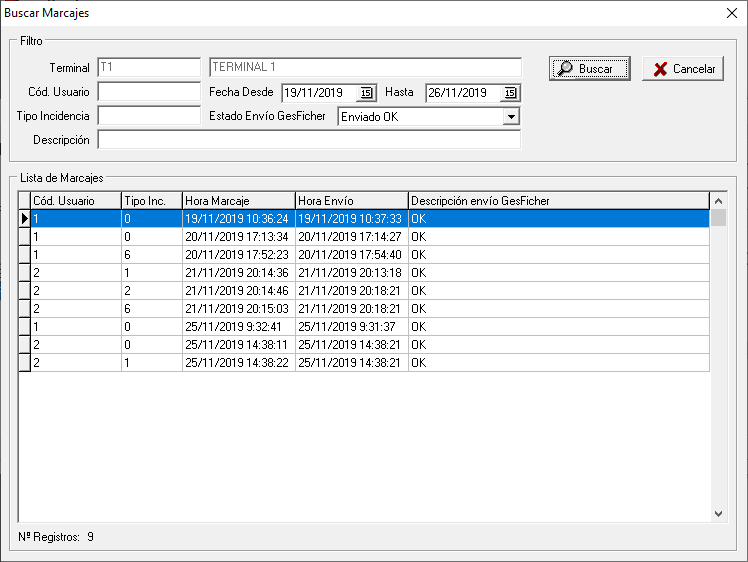
 Permite acceder a la pantalla de búsqueda de marcajes descargados del terminal que esté seleccionado. Por defecto se mostrará la lista de marcajes que se han descargado del terminal y están pendientes de enviar a GesFicher. En el filtro de la parte superior de la ventana puede cambiar los criterios de búsqueda, por ejemplo para buscar los marcajes enviados entre unas fechas determinadas, incluso de un usuario concreto o de un tipo de incidencia determinado, tal como se indica en la siguiente imagen:
 Permite descargar todos los marcajes que tenga almacenados el terminal que esté seleccionado. En el proceso automático de sincronización de marcajes, se descargarán sólo los últimos marcajes realizados, no todos. Con este botón se puede forzar a que se descarguen todos los marcajes que el terminal tenga almacenados, aunque ya se hayan descargado anteriormente.
 Permite borrar el terminal seleccionado.
 Permite importar o actualizar la lista de los terminales configurados en GesFicher. Anteriormente se ha indicado que en el proceso de configuración inicial de GesFicherSync se lanzará una consulta a GesFicher para obtener los terminales configurados. Si posteriormente se añade en GesFicher algún nuevo terminal, por ejemplo porque la empresa adquiera algún nuevo terminal de marcaje, a través de este botón se permite importarlo a GesFicherSync. Posteriormente habrá que configurar el terminal y activarlo para que se sincronicen los marcajes con GesFicher.
En la parte central de la pantalla se muestra la lista de terminales indicando la siguiente información para cada uno de ellos:
- EST: Icono identificando el estado del terminal, que puede estar "Activo", "No Activo" o "Falta configuración".
- COD. TERMINAL: Código de terminal que identifica el terminal en GesFicher.
- DESCRIPCIÓN: Nombre del terminal
- DES: Icono de estado de la última operación de descarga de marcajes del terminal. Puede ser OK o ERROR.
- ULTIMA DESCARGA: Fecha y hora de la última operación de descarga de marcajes del terminal. Entre paréntesis se indica el número de marcajes descargados en la última sincronización. Si se produjo algún error mostrará "ERROR".
- PTES ENVIAR: Nº marcajes descargados del terminal que están pendientes de enviar a GesFicher.
- ENV: Icono de estado del último envío de marcajes a GesFicher. Puede ser OK o ERROR.
- ULTIMO ENVIO: Fecha y hora de la última operación de envío de marcajes a GesFicher. Entre paréntesis se indica el número de marcajes enviados en la última sincronización. Si se produjo algún error mostrará "ERROR".